I get a lot of emails asking me how I create Disciplinary Action Adventures each week. I thought it might be interesting for aspiring and fellow cartoonists, as well as fun for readers, to see what goes on behind the scenes to create a World of Warcraft cartoon.
1. THE SEED OF AN IDEA
The first stirrings of a comic begin when I think of something funny to write about. For me, this is almost always a single line or character facial expression that makes me laugh. Frequently I’ll wake up with a clear sentence in my head that demands to be explained, and it goes from there.
Insider Moment: For Episode #1, it was “WTB Boobies”, which I overheard on a crowded trade chat. In Episode #2, the phrase “SPLORT!” came to me during lunch. These things cannot be explained.
2. THE POST-IT NOTE OF AN IDEA
Once I have the key phrase, I generally flesh out the comic in an extremely poorly-drawn sketch. These are usually perpetrated on Post-It notes (which I always keep handy), or, if I’m feeling fancy, notepaper. They’re unlovely but help me block out the number of panels I’m going to need and firm up the actual text of the comic. I pull the Post-Its into general coherency with a final, single-page draft of the comic:

3. CREATING THE BOILERPLATE
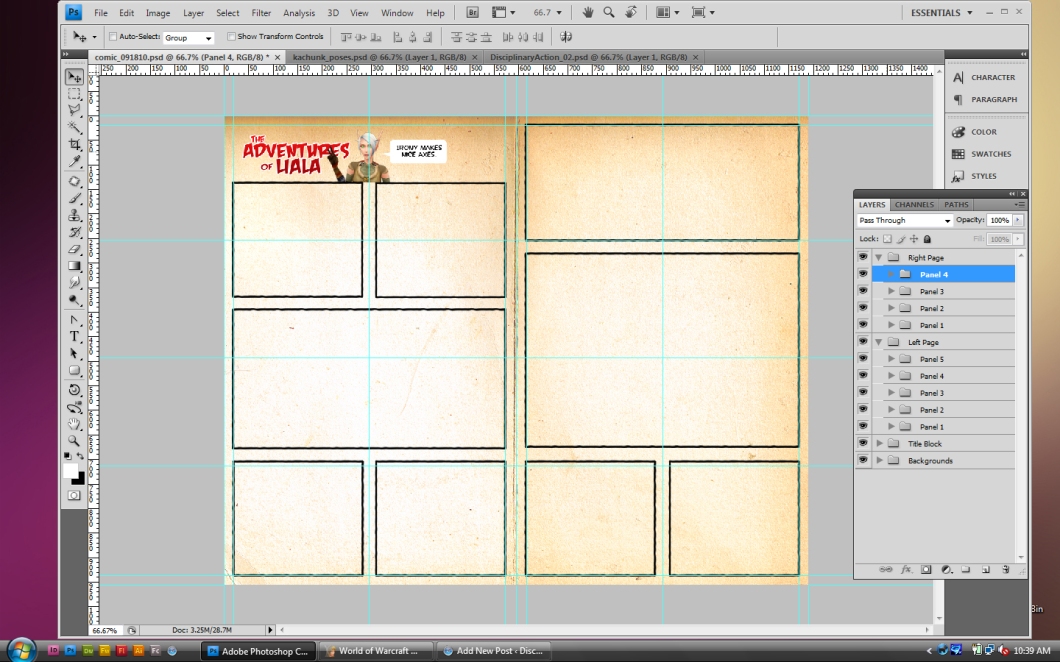
My first order of business is to pull up my blank comic template in Photoshop and start sketching out the frames.

I load in the header, which is the same for each comic, and change Liala’s talk bubble in the heading.

The next part is certainly one of the most tedious for me, which is blocking out and then drawing the frames. I’ll reference my original sketch, but start to rework the flow if more or fewer panels are needed to keep the page looking uncluttered. The comic is organized by left page and right page, and then by frame within each page. It helps keep the multiple layers (having over a hundred per comic is not unusual) straight in my head.

4. ADDING THE DIALOGUE
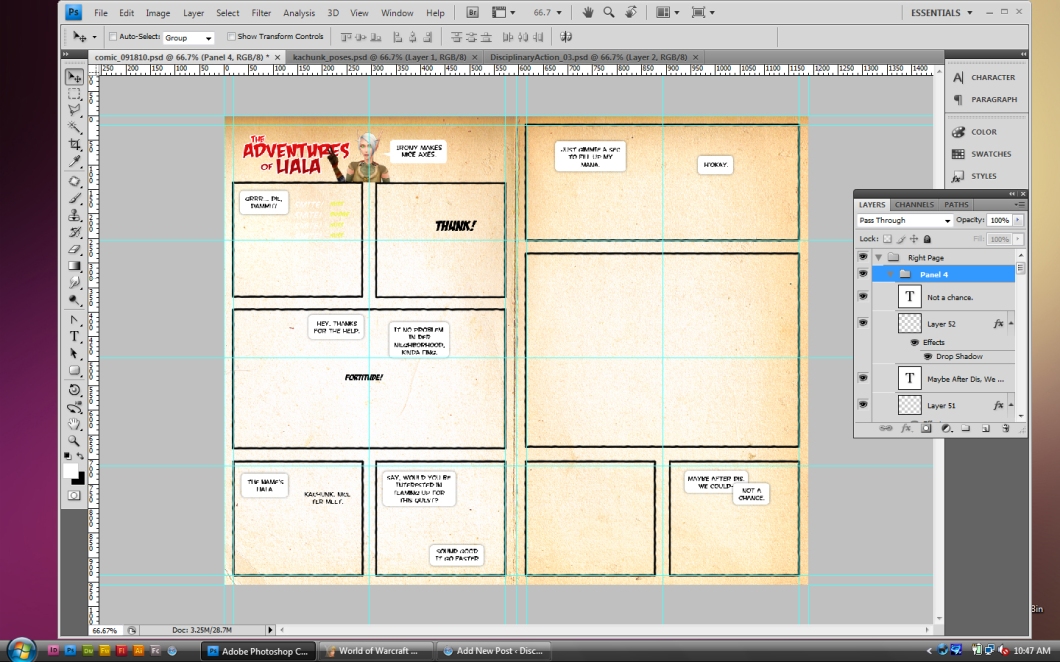
After the frames have been drawn, I go into each panel and add the dialogue roughly where I think it will fall in each panel. After that, I go back to each piece of dialogue and add the talk bubbles to the layers underneath.

5. CREATING THE CHARACTERS
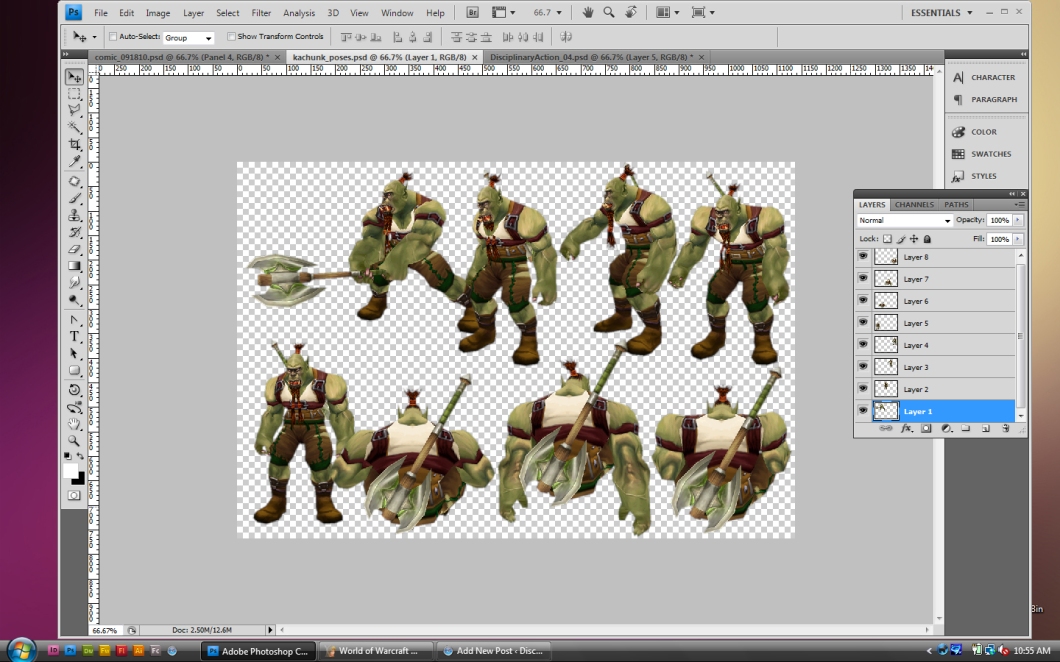
At this point I have a pretty clear image in my head of how each panel will look: the size and placement of the dialogue helps to guide the ‘look’ of each panel, as well. With that information in my head, I open up WoW Model Viewer and create my first character. For new characters, I play around for a bit getting their hair, face, and clothing right, and then I begin to pose that character for each frame.

I cut away the non-character background noise, and repeat the process for each panel that the character is in. At the end of the process I’m left with a single file with all of that character’s poses for the strip.

6. POPULATING THE COMIC
Once all of the characters have a sheet of poses for each panel, I import each pose into the corresponding panel. At this point, everything looks ferociously untidy, but in fact it’s the most fun part of the process.

After that’s all set, I go into WoW, visit the location I want, and take a few screenshots to use in the background. After that’s done, the background gets sized and pasted into each panel.

Then it’s back into the panels to move and resize the characters, add the tails of the talk bubbles, and paint the shadows. This is when I go back through and make all the little changes or add details.

A quick final check, and then it’s ready to post for my readers’ amusement and edification:
Disciplinary Action: Episode #6
The entire process, from idea to finished post, takes about ten to twelve hours, which I tend to spread out over two or three days.
I hope you’ve enjoyed learning a little more about what goes on behind the scenes here at Disciplinary Action Adventuuuuuuuuures!
Omg that is awesome, although I think your post-it sketches are still better than my “bee pit art”.
LikeLike
But the energy… the energy! 😉 And I’m so glad you enjoyed it!
LikeLike
that is so freaking cool. I would love to do something like that…but I think all mine would be durty. >.<
LikeLike
There’s no shame in that! You could do WoW comerotica. THERE IS A DEMAND.
LikeLike
[…] This post was mentioned on Twitter by Lewis Gregory, Lara and Disciplinary Action, Disciplinary Action. Disciplinary Action said: New post: Behind the Scenes at DA Adventures! http://bit.ly/aXYNJk Laws, Sausages, And Comics […]
LikeLike
Awesome stuff!!
I was actually one of those that have been wondering how you do it and what programs you use – I have played around with some WoW comic and logos design myself in the past, but my skills are nowhere nearly as elaborate as yours! =)
I was thinking of getting the model-viewer again just last night (am using the new armory character features atm, eugh), but it is still as heavyweight and dodgy as it used to be?
LikeLike
Glad you enjoyed it! It’s always an adventure to use the Model Viewer, isn’t it? It’s still quite similar to earlier builds, though I’m not certain which version you’ve been working with. It’s better than nothing, I suppose! 🙂
LikeLike
*boggles at skill*
LikeLike
This is what I was given instead of, y’know, understanding the intricacies of my class and twice weekly being an incredibly helpful person to priests. Unlike, say, yourself!
LikeLike
I find it so interesting as to how people put their comics together. You are very awesome!
LikeLike
Aw, shucks! /blush I’m glad you enjoyed it and found it interesting!
LikeLike
Awesome explanation! And it looks so good in the end!
I still have my ideas for my own comics, maybe I should give it a try – but I don’t know if I dare *lol*
Anyway, when’s Liala’s next adventure!!?
LikeLike
I loved your comic, and can’t wait to see more! (Everyone can check ’em out at http://spellbound.nu/gdpw ). I’ve amazed myself by finishing her next three adventures already, and will be cranking them out over the coming days. It has, for once, a story arc!
LikeLike
awesome guide I’ve played with modelviewer to do my banners, but never tried a comic.. I might have a go now 🙂
LikeLike
Glad to have been of assistance! It’s always a fun thing to try out 🙂
LikeLike
Wow, brilliant 😀 /bows down in awe. Got to have more of a play with model viewer one of these days!
LikeLike
Oh, you definitely should, it’s so much fun! And thanks for the very kind words; I’m getting all verklempt!
LikeLike
Awesome! I’m jealous of your process. Are you naturally organized or have you just practiced it a lot?
LikeLike
I’m naturally beyond organized. Wherever organized is, I’m generally about half a mile further down the road and speeding fast towards Crazytown. However, I imagine practice would have the same effect, and encourage you to utilize that method! 🙂
LikeLike
Awesome to see how you do it – I more or less did similar things with the little bits I’ve done for Gnomish Truth (ok I use Gimp instead of Photoshop)… the time it takes always surprises me and I’ve just done single pane things!
One thing I’ve wanted to play with and found lacking from the model viewer is being able to integrate shadows to the models somehow. In theory you can add lights, but it didn’t seem to do much for me. For world environments that isn’t necessarily noticeable (and it would depend when you do the background shots too) and part of that is how much it plays a role in the shot – the first one of these I did it was particularly noticeable because I took the screenshot while the place had pretty heavy shadows!
My pro-tip (that I learnt the hard way) is to make sure you save your characters from the model viewer! Although having a set of poses would help remarkably too!
LikeLike
Ha, definitely have to save the characters- very good pro tip! I haven’t ever re-utilized poses, and shadows are certainly amazingly time-consuming… but without them, I find you really don’t get anything like a complex comic. You’re right- it’s such a shame the Model Viewer doesn’t assist with that dinosaur of a process!
LikeLike
This is awesome and inspiring!
LikeLike
I hope it leads to some awesome comics- you have to link us to them so we can all enjoy! 😀
LikeLike